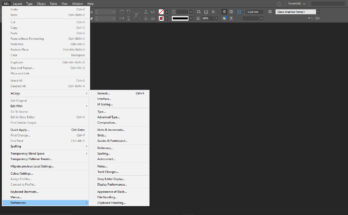
The last of the menu which is used by designers is the Window Menu, where we have the option to Arrange the open windows of files Horizontally or Vertically. We have also an option to arrange our workspace according to our needs. It has various options that change the look and feel of our screen.
Window menu is the menu where we get all our docker windows together in one place. We find the option to open Colour, Gradient, and Swatches, which opens a small docker with options to change it according to our needs.
There is also an option called Control, which changes according to the tool we are using. For example, if we use text tool. It changes its appearance to change the styles and size of text. If we use box or line, it changes to that particular options.
There is also an option called Info, which shows the status of our mouse and also elements we have selected.
We also have an option called Interactive, which have various multimedia options. They can be seen if we convert our document to an Interactive PDF and view it in Adobe Acrobat, or Acrobat Reader.
We have an option to open the Layers palette, which is used while we are creating an artwork which involves many layers. The layers are the elements which bring the element being created to front and can be defined as the top layer in the layer palette.
We can also find the links palette, which shows the list of all the images we use in that particular document. We can also find where the particular image is placed and also the camera and resolution of the image.
We have an option called Object & Layout, which has various other sub options
- Align – It has the options by which we can align selected 2 objects to align with each other.
- Pathfinder – This is an option that gives the selected object to merge with each other. This will be explained in later posts
- Transform – This gives the control to scale the selected element.
There is also an option in Output option called Attributes, which has an option to convert a selected element to overprint and also making a selected element to non printing.
There is also various other options called, Flattener Preview, Separations Preview (It has options to see CMYK colour separations in our document before we send it for printing. This helps in defining the exact colour we get while we print the document. There is also called Trap Preset, which helps in seeing the status of trapping we give while we print one colour upon another.
There is also called an option called Pages, which brings a docker which shows the number of pages in our document, which has a small thumbnail preview of what is present in that particular page.
We also have an option to see the properties of the document, i.e., the size of the document, the number of pages, margin which we have set for that document, rules, grid, and other information.
We also have an option to open the stroke palette, where we can set the weight of stroke, mitre limit, type of stroke, Start / End arrows (even different types of arrows), also can set the colour for gap between the strokes.
Different types of styles, like paragraph style, character style, table styles, object styles, and others… We also have an option to give text wrap to an object, which is placed in between text. We also have Types & Tables option and also Utilities option, which is of not much use to a designer who is fluent in page making.
We also have an option to see the open files and their file names.
There is also a menu called Help, which is basically the online help file, which is a guide to show the options of Indesign and also an option to Sign In to Adobe.
Note: The later posts will explain the dockers and dialog boxes in detail.